Wednesday, July 24, 2013

Digital Photo File Organization & Tips

#1: Keep back-ups of your files!

Portal data storage is getting more and more inexpensive, it doesn't make sense not to have your data saved in multiple locations. Photos are nearly priceless, you will never get those moments back.

What I do... I have a copy on:
- my laptop,
- a portal 1TB hard drive (a couple actually),
- and a non-portal large hard drive (2TB).

Rational: My laptop is where I work and the portal hard drive is my life back-up. I don't leave home without this puppy. Depending on what I'm working on, is the portal drive that travels with me. I have a portal hard drive for recent photos and files from the last few years, and one for older photos and files. [Because I take way too many photos, but maybe you can manage to have one portal hard drive.] The non-portal gets backed up with everything and does not get touched.

**Did you know .JPEG save at a lower quality after they're edited**

#2: Folder Organization

Photos
For my photos, I organize by the date they were taken. This helps me easily upload photos because I don't have to think, makes sharing pictures a breeze and helps with my style of chronological scrapbooking. Whenever I receive shared photos from family/friends or upload, I instantly know whether I already have the them.
Sometimes, I create another folder under the month for a special occasion (e.g. Disney Trip, etc.). If the special occasion overlaps months, I select the earlier month or the starting month.

This is how I organize my photos:
BeyondPrincess.blogspot.com: Digital file organization & tips including photos - so helpful!
At the top, a Photo folder, then folders for each year with sub-folders for each  month.

Scrapbooking Supplies
With all the great computer search options it's easy to find things but it doesn't help when you're browsing for inspiration or just to see what you've got.

This is how I organize my digital scrapbooking supplies:


BeyondPrincess.blogspot.com: Digital file organization & tips including photos - so helpful!
_New Files: where I dump files to be sorted later, such as freebies
 
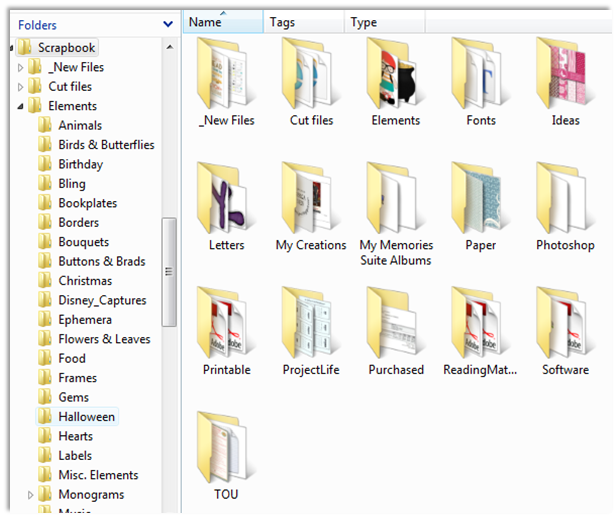
Cut files: (SVGs) files for my cutting machine

Elements: this has many sub-folders based on how I think of the different clip art, see the left side for some of the sub-folders
 
Fonts: too many fonts can slow down your computer, it's best to only install the fonts you plan to use or use often

Ideas: pictures of other's work, sketches, templates, etc.

Letters: alphas and numbers, I use these often so I didn't want them hidden in the elements folder
 
My Creations: digital files and photos the stuff I created.
 
MyMemories Suit Album: I use MyMemories Suite for digital scrapbooking and I love this software - these are my working in progress files

Paper: digital (scrapbooking) paper - I've also added the color to the beginning of the file name - this is how I tend to look for papers

Photoshop: photoshop file type, these can only be used with Photoshop

Printable: these are Adobe file type, usually 8.5"x11" prints

ProjectLife: my latest folder add, for journal cards

Purchased : these are duplicate (still in compressed folders) of things I purchased in their original bundled format. I like to break up the kits I buy but I have found I like to refer back to the bundle for reference.

ReadingMaterials: articles

Software: digital backup of my crafting software and license files. It is so important to save the .exe files (not just hit the RUN button) provided with software purchases or even free downloads (who wants to search for it again, really). If youre computer crashes, all the programs are ready to be installed again.

TOU: (aka Terms of Use) also a new folder, these files come from freebies and purchased files - I make sure the file names match the other file which I had downloaded for easy reference.


Can you tell I've had computers crash on me, multiple times. I've lost time rebuilding but fortunately lost none of my data. Having a hard drive that is all organized, rebuilding is a breeze and you can pretty much hop on any computer and have what you need nearly immediately.


#3 Use your wonderful Photos, Pages and Supplies

Print them! Get your photos, scrapbook pages and digital supplies into the real world. If you think about it, when it sits on the computer only we get to enjoy them but it's so much more to share it with those you love, and why not, these are often their memories too and works of art that inspire (and you should be proud of your hard work).

Tuesday, July 9, 2013

Princess Apron #1

A Pinterest success!
I saw a picture of these princess aprons (link here) and thought geez these would be so much better than full dresses for my little girls [especially when we go to Disney World later this year]. 

Princess Dress-Up Aprons instead of actual dresses. Easy to put on. Will fit while she grows.

After the better part of a night, into the early morning (despite still having to go to work in the morning), I finished this [Sleeping] beauty. Totally corny. It took me longer than it should because I had to relearn my sewing machine, decide exactly what I was going to do, oh and re-sew all the ties because the first time I sewed them into the wrong side. Helpful tip if you attempt this... If you sew a double layer apron the ties remain with the right side (duh, I know). I bought the fabric at Hancock Fabric - it's cotton; the tulle and gold [holiday] ribbon came from my stash. I mostly winged it. If you would like more details, let me know.
BeyondPrincess.blogspot.com: Pretty Princess Apron - Sleeping Beauty Pink      BeyondPrincess.blogspot.com: Pretty Princess Apron - Sleeping Beauty Pink


Thanks for visiting!

All the Best,
Jessica

Wednesday, January 23, 2013

Free Princess SVG and lots more

We are all about princesses and crafty! How about you?
We definitely need some free princess cut files here and fortunately this search brought me to a couple awesome sites to share with you. I really liked these princess SVG files from Shery K Designs, my girls LOVE Princess Tiana -- Princess and the Frog

http://www.sherykdesigns-blog.com/2011/03/free-svg-princess.html


http://www.openclipart.org/tags/silhouette?page=1
More than 600 free silhouette SVG Cliparts

Thanks for visiting!

All the Best,

Jessica

Monday, December 24, 2012

Project Life: 2012 Week of Dec 3-9


BeyondPrincess.blogspot.com: Project Life DecemberBeyondPrincess.blogspot.com: Project Life December


This week we started our annual Christmas traditions, a lot for one weekend, but with little ones enough never seems to be enough. We started with making sugar cookies. They are serious cookie makers. Then we rounded out Sunday with trying a really old gingerbread house kit and visiting Santa at the Mall. We love this Santa, he has been our Santa since Sarah's first Christmas - he's very nice and authentic. [Did you catch the photo bomb, Dad's hand about to save Grace, but I love Sarah's expression especially compared to Grace's.]


BeyondPrincess.blogspot.com: Project Life December

Fonts: Journaling: Segoe Print; Date: SansSerif
Elements, Cards: Page 1 bottom-righ: combined digital paper with a white box; Page 2 middle-left: by Sheri Horton freebie

Project Life is a back-to-basics approach to memory-keeping created by Becky HigginsIt can be anything you want it to be. To learn more about Project Life check out Becky’s Website. The pieces used in my album are available through Jessica Sprague here and Lettering Delights here.  My Project Life is all digital, I'm using My Memories Suite. Simple.

Thanks for visiting!
All the Best,


Jessica

Monday, August 6, 2012

Bathroom Updo

BeyondPrincess.blogspot.com: Bathroom Remodel cheap - good advice


I had one of those - I can so totally do that moments - so I did it!
Plus, I have finally used those hours of "researching" Pinterest to do something productive.

Inspiration: Centsationalgirl.com
Obsession: Target's Avington Furniture - this brown matches exactly! Oh yeah!

My bathroom wasn't ugly, just plain - really plain and white. I thought it's time to make it feel more like the perfect home, that it is. (The picture was nearly, before - I might have started painting to test the color, opps.)

BeyondPrincess.blogspot.com: Bathroom Remodel cheap - good advice
White, white bathroom
My poor husband should have know I was up to something when out of the blue I tell him I'm going to Lowes. Here's what I got... adding up to $37!
 Paint, moulding board, drawer handles, unfinished feet, nice paint brush, hardware to hang the mirror

BeyondPrincess.blogspot.com: Bathroom Remodel cheap - good advice So whatcha ya think? Was it worth $37?

BeyondPrincess.blogspot.com: Bathroom Remodel cheap - good adviceBeyondPrincess.blogspot.com: Bathroom Remodel cheap - good advice

Couple tips:

The frame around the mirror was actually more difficult then it appears. You'll have to decide how to assemble and hang it. I used self taping screws on the corner brackets and wood putty to fill in the gaps. We (I recruited my husband) hung the frame using picture wire, so I could clean behind it. But the real tip, the frame must be painted on both sides because of the reflection.

Painting the vanity cabinets, I found that painting a thin first layer saved me from having to sand between coats or getting paint running down the sides. (I didn't use a primer either) A nice paint brush is worth the extra few bucks.


I would love to hear about your projects!


Thursday, March 1, 2012

DIY Home Decor

I found this pretty glass piece (empty) at Marshalls which was under $10. I was thinking to fill it with colored layers of candy, M&Ms, Skittles, peppermints. But when it came time to pouring the candy, I couldn't do it. Knowing that all that candy would be sitting there begging me to eat it. Or [gasp] candy just going to waste...  I don't think so.

I rumaged through the pantry and found anything cheap, colorful and most importantly had a long shelf life.  I ended up with simple things you can do too.


First, find a glass container that closes (to keep out dust and probably bugs).
Next, fill the sucker**. I used popcorn kernels, purple rice, brown lentils, white rice, green lentils, but you could go wild with different noodles, beans and grains. Also I cheated by sticking a drinking glass in the center to cut down on materials. But being cheap has it perks because now I could put a candle inside.

Another thought, how about following a cute little mason jar recipes. I love the look of those, that would be easy to do on a larger scale.


**If you're a bit (or a lot) of a perfectionist... remember to level the layer before adding the next.

I enjoy the natural look of the decor. Currently this is sitting on top of our entertainment center. I would love to see what creation you have made.

Supplies Used:


 Loading InLinkz ...